Difference between revisions of "Using a PuTTY SSH Tunnel with Visimage3"
(→Step 1: Create a new Session:) |
|||
| Line 3: | Line 3: | ||
=== Configuring an SSH Tunnel in PuTTY === | === Configuring an SSH Tunnel in PuTTY === | ||
These instructions assume that PuTTY is already installed. | These instructions assume that PuTTY is already installed. | ||
| + | |||
| + | Fiserv SaaS (online) clients should contact Fiserv for the following information prior to configuring an SSH Tunnel. All other clients should contact their local IT department: | ||
| + | *The host username. For example "boi25" or bot25", where 25 is a sample client number.<br />The username is used as part of the '''Host Name''' configuration in Step 1. | ||
| + | *The host IP address. For example "172.21.1.40".<br />The IP address is used as part of the '''Host Name''' configuration in step 1 '''and''' the Tunnel '''Destination''' configuration in step 2. | ||
| + | *The host port where vsrvTCP is listening, for example "30502".<br />The port is used as part of the Tunnel '''Destination''' configuration in step 2. | ||
====Step 1: Create a new Session:==== | ====Step 1: Create a new Session:==== | ||
| Line 13: | Line 18: | ||
====Step 2: Configure the SSH Tunnel:==== | ====Step 2: Configure the SSH Tunnel:==== | ||
*In the left hand Category panel, click the plus next to '''SSH''' and then select '''Tunnels'''. | *In the left hand Category panel, click the plus next to '''SSH''' and then select '''Tunnels'''. | ||
| − | *Enter the ''' | + | *Enter the '''Source (local) port''', for example "30501". You can use any available port number. |
| − | *Enter the ''' | + | *Enter the '''Destination''', for example "172.21.1.40:30502". You must use the correct IP address for your host server where AskPlus is installed and you must use the port number where vsrvTCP is listening. The IP address and port are separated by a colon. |
| − | |||
*Click '''Add''' to create the forwarded port. | *Click '''Add''' to create the forwarded port. | ||
[[File:ConfigurePuTTY2.jpg|400px|Creating a new PuTTY Sesson]] | [[File:ConfigurePuTTY2.jpg|400px|Creating a new PuTTY Sesson]] | ||
Revision as of 17:44, 22 April 2022
Using PuTTY to create an SSH Tunnel is an easy and convenient way to encrypt Visimage3 communication between your local PC and the host server. This type of tunneling can be used with any version of Visimage3, however, version 3.4.2.2 includes new features that will automatically launch PuTTY in the background whenever the Visimage3 server is started.
Contents
Configuring an SSH Tunnel in PuTTY
These instructions assume that PuTTY is already installed.
Fiserv SaaS (online) clients should contact Fiserv for the following information prior to configuring an SSH Tunnel. All other clients should contact their local IT department:
- The host username. For example "boi25" or bot25", where 25 is a sample client number.
The username is used as part of the Host Name configuration in Step 1. - The host IP address. For example "172.21.1.40".
The IP address is used as part of the Host Name configuration in step 1 and the Tunnel Destination configuration in step 2. - The host port where vsrvTCP is listening, for example "30502".
The port is used as part of the Tunnel Destination configuration in step 2.
Step 1: Create a new Session:
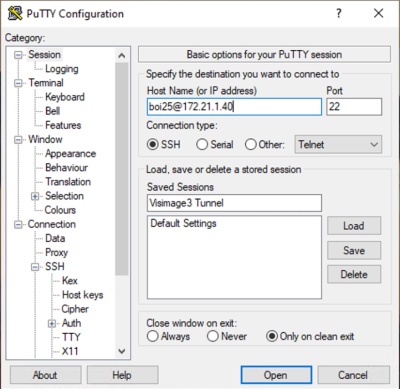
- Run PuTTY and create a new session by entering the Host Name (or IP address), the Port (22) and the Connection type (SSH).
- Under Host Name enter username@ip-addr, for example "boi25@172.21.1.40".
- Enter the session name under Saved Sessions, for example "Visimage3 Tunnel".
- Do not Save the session yet, we still need to configure the SSH Tunnel information.
Step 2: Configure the SSH Tunnel:
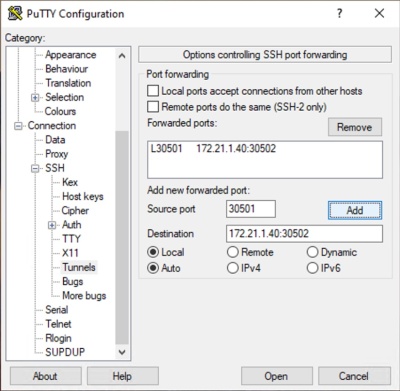
- In the left hand Category panel, click the plus next to SSH and then select Tunnels.
- Enter the Source (local) port, for example "30501". You can use any available port number.
- Enter the Destination, for example "172.21.1.40:30502". You must use the correct IP address for your host server where AskPlus is installed and you must use the port number where vsrvTCP is listening. The IP address and port are separated by a colon.
- Click Add to create the forwarded port.
- The IP address and port number shown here are only examples. You must use the appropriate values for your organization.
Step 3: Configure the Private Key File:
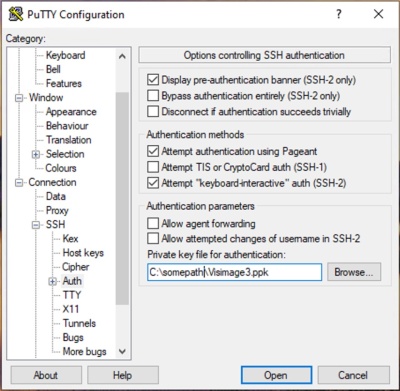
- We recommend using a Private Key File to authenticate the connection.
- Fiserv SaaS (online) clients will receive a Key File from Fiserv. This file is required to create the tunnel.
- In the left hand Category panel, in the SSH section, select Auth.
- Click Browse... to open the Private Key File.
Step 4: Save the PuTTY Session:
- In the left hand Category panel, scroll to the top and click on Session.
- On the right hand side of the window, click Save to save the session.


