Vital Signs FAQ
Contents
Overview
The Vital Signs frequently asked questions page covers all of the top issues that clients have experienced and had resolved. If there is a question that is not covered please contact support@vital-soft.com for immediate assistance.
Changing the Windows Server IP Address
If you need to change the Windows Server IP address, make sure to update the VS_HOSTIP in the /ASKPLUS/vsdata/vitalsigns.ini. If this the VS_HOSTIP is not updated, the following nightly extract will abbend with an FTP connection failure.
Changing the Windows FTP Credentials
If the FTP login credentials for the Windows server are modified, the FTP_USER and FTP_PASSWD should be updated in /ASKPLUS/vsdata/vitalsigns.ini
UC4 - RPC Listener Error
UC4 stdlist Errors :
   Error xmlrpc exception
   Serious error occurred while processing.
   Failed to reload : data\mbrshln\Load_Qvd_MBR_SHARE_LOAN VSPID : VS_1394
   (238, 'Connection timed out')
Resolution:
- Verify that the Python Listener is running on the Windows machine, look for a process named python.exe *32
- Verify that VS_HOSTIP in /ASKPLUS/vsdata/vitalsigns.ini is the correct IP for the Windows host
Open in Server Macro Prompt
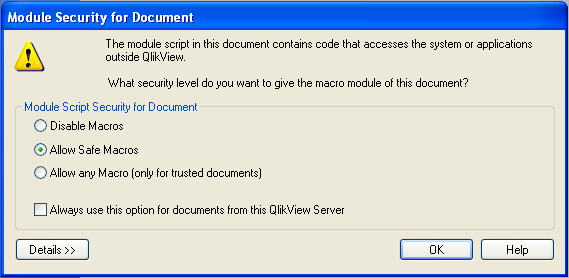
Depending on the Application being opened in Vital Signs via the QlikView client, you may see the following prompt :
The answer to this prompt will determine if the Application will function as designed.
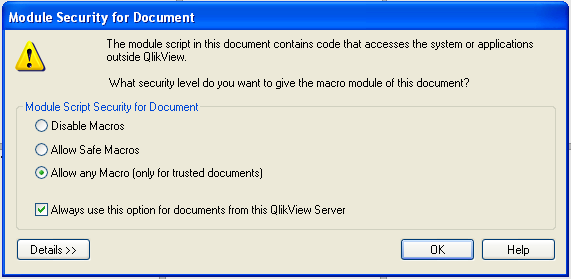
Select "Allow any Macro (only for trusted documents)", check "Always use this option for documents from this QlikView Server" and click OK.
How to Reset Open in Server Macro Permissions
Open Regedit
- Windows XP
- Click the start menu, click Run, enter regedit and press enter.
- Windows 7
- Click the start menu, enter regedit into the search and open the regedit.exe program that is returned in the upper menu area.
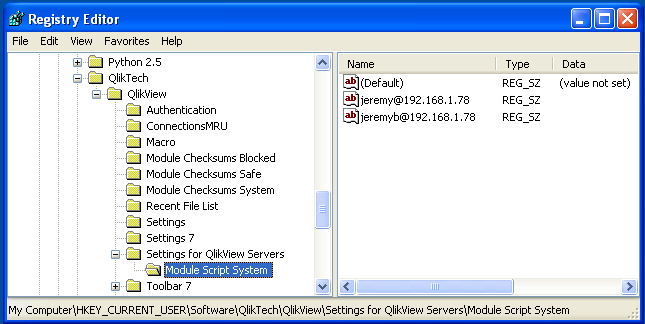
Once Regedit is open, browse for
HKEY_CURRENT_USER\Software\QlikTech\QlikView\Settings for QlikView Servers\Module Script System
In the right hand window, delete the individual login that was used when the incorrect Macro Selection was made.
Exit Regedit and open QlikView again, select open in server and open the document that originally prompted for the Macro Security. Choose the recommended options and click OK.
Vital Signs Applications are not Functioning
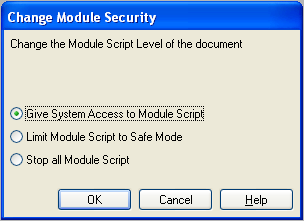
If the Vital Signs applications are not functioning properly, the first thing to check is the permissions for Macros in the Applications. In order to verify the Macro settings, open the Application and press <Shift> + <Ctrl> + <M>
The correct setting is Give System Access to Module Script. If it is set to any of the others, we recommend that you reset the Macro Security and select the correct option when prompted : Vital Signs FAQ#How to Reset Open in Server Macro Permissions
Adding a new Member Attribute
Adding a new Member level attribute named Has Charged Off
Step 1. Gather the criteria for the Attribute
Step 2. Determine what Attribute Number you wish to populate on the Mbr Attributes screen
Step 3. Modify the ATTRFILE
- Login to the HPUX system as the askplus user
- Edit /ASKPLUS/vsdata/custom/live/ATTRFILE
   #Example Output
   NBR__IDX__CNT__PRIMARY.TOPIC_________________INCLUDE___FIELD-NAME__________Attribute Description_________X
   1    1         SHLNTOTS.SHLNTOTS             ITOTATTR  SINGLE-SERVICE      Single Service                X
   2    1         MEMBRS.SHARE-FILE             ISHRATTR  ACCT-FUNDED         Sfx 0 Funded                  X
   3    1         MEMBRS.MEMBER-FILE            IMBRATTR  EMPLOYEE            Employee                      X
   4    2         MEMBRS.MEMBER-FILE            IMBRATTR  CHGOFF              Charged Off                   X
   5    3         MEMBRS.MEMBER-FILE            IMBRATTR  OK-TO-MAIL          OK to Mail                    X
- Add the Attribute as an Available NBR between 1 and 30.
   NBR__IDX__CNT__PRIMARY.TOPIC_________________INCLUDE___FIELD-NAME__________Attribute Description_________X
   1    1         SHLNTOTS.SHLNTOTS             ITOTATTR  SINGLE-SERVICE      Single Service                X
   2    1         MEMBRS.SHARE-FILE             ISHRATTR  ACCT-FUNDED         Sfx 0 Funded                  X
   3    1         MEMBRS.MEMBER-FILE            IMBRATTR  EMPLOYEE            Employee                      X
   4    2         MEMBRS.MEMBER-FILE            IMBRATTR  CHGOFF              Charged Off                   X
   5    3         MEMBRS.MEMBER-FILE            IMBRATTR  OK-TO-MAIL          OK to Mail                    X
   15   4         MEMBRS.MEMBER-FILE            IMBRATTR  EXAMPLE-ATTRIBUTE   What you will see in VS       X
Step 4. Modify the Attribute Criteria file
- Since the criteria is coming MEMBRS.MEMBER-FILE, the INCLUDE column will be IMBRATTR and that is the file to modify.
- Edit /ASKPLUS/vsdata/custom/live/IMBRATTR
   # Example output :
   * Calculate MEMBER-FILE Attributes:

   << Employee >>
   #ATTR(1)=(MEMBER-FILE.CONTROL-FLAGS(73)=1)

   << Charged Off >>
   #ATTR(2)=(MEMBER-FILE.CONTROL-FLAGS(34)=1 OR MEMBER-FILE.CONTROL-FLAGS(31)=1)

   << OK To Mail >>
   #ATTR(3)=(MEMBER-FILE.CONTROL-FLAGS(21) <> 1 AND MEMBER-FILE.CONTROL-FLAGS(24) <> 1 AND
             MEMBER-FILE.CONTROL-FLAGS(29) <> 1)
   *
- Add the new Attribute, the index of the #ATTR(N) should be unique and incremented to the next available number. This number should also match the IDX column in ATTRFILE.
   # Example output :
   * Calculate MEMBER-FILE Attributes:

   << Employee >>
   #ATTR(1)=(MEMBER-FILE.CONTROL-FLAGS(73)=1)

   << Charged Off >>
   #ATTR(2)=(MEMBER-FILE.CONTROL-FLAGS(34)=1 OR MEMBER-FILE.CONTROL-FLAGS(31)=1)

   << OK To Mail >>
   #ATTR(3)=(MEMBER-FILE.CONTROL-FLAGS(21) <> 1 AND MEMBER-FILE.CONTROL-FLAGS(24) <> 1 AND
             MEMBER-FILE.CONTROL-FLAGS(29) <> 1)
   << Example Attribute >>
   #ATTR(4)=(MEMBER-FILE.CONTROL-FLAGS(75)=1)
   *
Step 5. Review Membership_Analysis_by_ACCOUNT after the next nightly extract for the new Attribute


