Using a PuTTY SSH Tunnel with Visimage3
Using PuTTY to create an SSH Tunnel is an easy and convenient way to encrypt Visimage3 communication between your local PC and the host server. This type of tunneling can be used with any version of Visimage3, however, version 3.4.2.2 includes new features that will automatically launch PuTTY in the background whenever the Visimage3 server is started.
Contents
- 1 Configuring an SSH Tunnel in PuTTY
- 1.1 Fiserv SaaS (online) clients should contact Fiserv for the following information prior to configuring an SSH Tunnel:
- 1.2 Step 1: Create a new Session
- 1.3 Step 2: Configure the SSH Tunnel
- 1.4 Step 3: Configure the Private Key File
- 1.5 Step 4: Save the PuTTY Session
- 1.6 Step 5: Test the Configuration
- 2 Configuring Visimage3 to use a PuTTY SSH Tunnel
- 3 Using a PuTTY SHH Tunnel wih Older Versions of Visimage3
Configuring an SSH Tunnel in PuTTY
These instructions assume that PuTTY is already installed.
Fiserv SaaS (online) clients should contact Fiserv for the following information prior to configuring an SSH Tunnel:
- The host username. For example "boi25" or bot25", where 25 is your client number.
The username is used as part of the Host Name configuration in Step 1. - The host IP address. For example "172.21.1.40".
The IP address is used as part of the Host Name configuration in step 1 and the Tunnel Destination configuration in step 2. - The host port where vsrvTCP is listening, for example "30502".
The port is used as part of the Tunnel Destination configuration in step 2. - Fiserv will also provide you with the Public Key File needed in step 3. This file is protected by a Passphrase which will also be supplied by Fiserv.
Other clients should request this information from their own IT department.
Step 1: Create a new Session
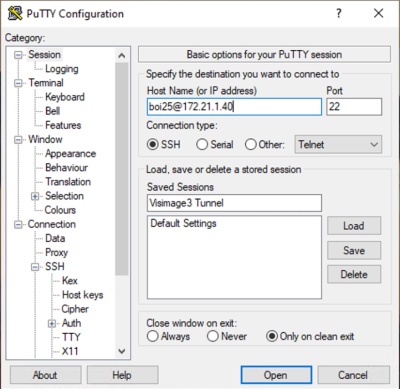
- Run PuTTY and create a new session by entering the Host Name (or IP address), the Port (22) and the Connection type (SSH).
- Under Host Name enter "username@ip-addr", for example "boi25@172.21.1.40".
- Verify that the Port is set to 22 and SSH is selected as the Connection Type.
- Enter the session name under Saved Sessions, for example "Visimage3 Tunnel".
- Do not Save the session yet, we still need to configure the SSH Tunnel information.
Step 2: Configure the SSH Tunnel
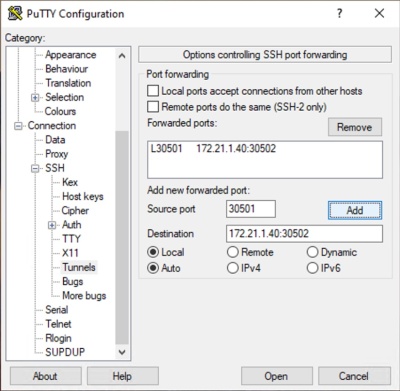
- In the left hand Category panel, click the plus next to SSH and then select Tunnels.
- Enter the Source (local) port, for example "30501". You can use any available port number.
- Enter the Destination, for example "172.21.1.40:30502". You must use the correct IP address for your host server where AskPlus is installed and you must use the port number where vsrvTCP is listening. The IP address and port are separated by a colon.
- Click Add to create the forwarded port.
- The IP address and port number shown here are only examples. You must use the appropriate values for your organization.
Step 3: Configure the Private Key File
- We recommend using a Private Key File to authenticate the connection.
- Fiserv SaaS (online) clients will receive a Key File from Fiserv. This file is required to create the tunnel.
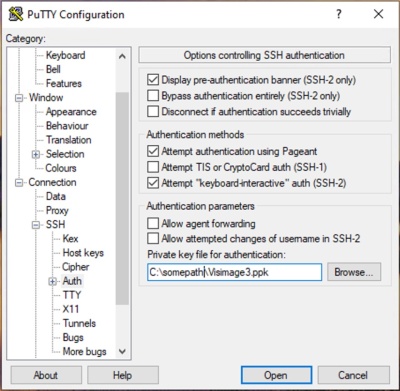
- In the left hand Category panel, in the SSH section, select Auth.
- Click Browse... to open the Private Key File.
- Make sure that Attempt authentication with Pageant is checked.
Step 4: Save the PuTTY Session
- In the left hand Category panel, scroll to the top and click on Session.
- On the right hand side of the window, click Save to save the session.
Step 5: Test the Configuration
- Click Open to launch the Tunnel and connect to the host. Since you are using a Key File protected with a Passphrase you will need to enter the passphrase to test the connection.
Configuring Visimage3 to use a PuTTY SSH Tunnel
Starting with Version 3.4.2.2, Visimage3 has been enhanced to automatically start a PuTTY SSH Tunnel session in the background while starting server. When you exit server, this PuTTY session will be closed.
Configuring a Visimage3 Connection
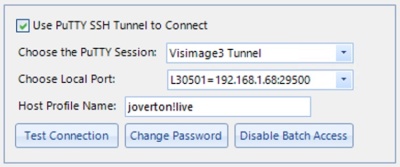
- Click Use PuTTY SSH Tunnel to Connect
- Visimage3 will load a list of PuTTY sessions that contain tunnel configurations. Select the appropriate choice.
- After selecting the session, Visimage3 will load the configured Local Port tunnel definitions. Select the appropriate choice.
- Finally, enter the Host Profile Name the same as you would for any connection.
- If the "Use PuTTY SSH Tunnel to Connect" choice is not visible, goto Edit > Preference > SSH Tunnel to enable this choice.
Understanding the Role of Pageant
Pageant is an SSH authentication agent included with PuTTY. It holds your private keys in memory, already decoded, so that you can use them often without needing to type a passphrase. Since the SSH Tunnel used by Visimage3 is protected by a key file with a passphrase it is preferable to only enter the passphrase once and have Pageant remember it for you.
The user can choose to run Pageant on system startup or have Visimage3 launch it for you. Additional information on Pageant can be found here.
Note: On servers where Visimage3 is configured to execute via the Windows Task Scheduler, you must configure Pageant to start after reboot.
Starting Server with a Connection using a PuTTY SSH Tunnel
- Whenever you start server with a connection defined to use a PuTTY SSH Tunnel, Visimage3 will check to see if Pageant is already running.
- If it is running, Visimage3 assumes that the necessary Private Key File has been loaded.
- The start server process will fail if Pageant is running, but the required key file is not loaded.
- If Pageant is not running, Visimage3 will launch Pageant and pass the required key file. The user will be prompted for the passphrase by Pageant, and Visimage3 will wait until the correct passphrase has been entered.
- Visimage3 will not shutdown Pageant when exiting server, so it is won't be necessary to enter the passphrase again until your PC is rebooted (or Pageant is shutdown.)
- Pageant can be accessed via the System Tray where it appears with an icon of a computer wearing a hat.
Once Pageant is running, Visimage3 will continue the start server process by launching PuTTY in the background. There will be no need to authenticate any passwords for the tunnel because that is automatically handled by Pageant. Visimage3 will then connect to the local port, and if the tunnel is properly configured (and vsrvTCP is running on the host) the server will be started.
Import Things to Remember
- Pageant is required in order for Visimage3 to be able to start PuTTY automatically.
- The private key file used to authenticate the tunnel must be loaded into Pageant.
- Visimage3 will automatically launch Pageant if it is not running and load the private key file.
- The user will have to enter the passphrase when Pageant is run.
- In batch, you must run Pageant and load the private key and enter the passphrase whenever the system is rebooted.
Using a PuTTY SSH Tunnel with Visimage3 in Batch
As long as Pageant is running with the private key file loaded there are no special instructions for using an SSH Tunnel in batch. Remember that Visimage3 will not be able to start server using a PuTTY SSH Tunnel in batch if Pageant is not running.
There are several methods to start Pageant:
- Run Visimage3 and Start server.
- Create a bat file to start Pageant with your private key file. The syntax is:
"C:\Program Files\PuTTY\pageant.exe" "C:\somepath\name_of_key_file.ppk"
- Remember to place quotes around the fully qualified name of Pageant and the key file if there are any blank characters in the filename.
- Create a task in the task scheduler to launch shortly after system reboot (or logon).
Remember that all of these methods will require that you specify the passphrase associated with the private key file.
Using a PuTTY SHH Tunnel wih Older Versions of Visimage3
It's possible to use a PuTTY SSH Tunnel with older versions of Visimage3, or without using Pageant. The logic is similar to configuring a connection to use sTunnel. Follow these steps:
- Configure the tunnel as described above.
- In the Visimage3 Connection window:
- In the Host Address, enter 127.0.0.1
- In Host Port, enter the local port from the tunnel you configured (30501 in our example)
- Before running Visimage3, launch PuTTY and open the SSH Tunnel session to connect.
- Now run Visimage3, as long as PuTTY is running with the tunnel loaded, Visimage3 will be able to connect.


