Difference between revisions of "Visimage 2.6 on Windows 7 64bit"
>Jeremyb (→Download and Installation) |
>Jeremyb |
||
| Line 75: | Line 75: | ||
* Finish the setup by clicking Start Setup | * Finish the setup by clicking Start Setup | ||
:[[File:Xp Mode 16.png]] | :[[File:Xp Mode 16.png]] | ||
| + | |||
| + | |||
| + | |||
| + | ===Installing Visimage=== | ||
| + | |||
| + | |||
| + | * Download Visimage to the Desktop using this url : http://www.vital-soft.com/download/secure/software/Visimage_2602_Setup.zip | ||
| + | |||
| + | |||
| + | * Unzip Visimage_2602_Setup.zip and run the Visimage_2602_Setup.exe | ||
| + | |||
| + | |||
| + | * Click Next | ||
| + | :[[File:InstallVisimage1.png]] | ||
| + | |||
| + | |||
| + | * If you accept the terms in the license agreement click Next | ||
| + | :[[File:InstallVisimage2.png]] | ||
| + | |||
| + | |||
| + | * Enter the applicable information and click Next | ||
| + | :[[File:InstallVisimage3.png]] | ||
| + | |||
| + | |||
| + | * Choose the directory where Visimage should be installed and click Next | ||
| + | :[[File:InstallVisimage4.png]] | ||
| + | |||
| + | |||
| + | * Choose the path to store profiles and click Next | ||
| + | :''Note: this is the Edit->Preferences profile path in Visimage'' | ||
| + | :[[File:InstallVisimage5.png]] | ||
| + | |||
| + | |||
| + | * Choose Typical and click Next | ||
| + | :[[File:InstallVisimage6.png]] | ||
| + | |||
| + | |||
| + | * Verify the settings and click Install | ||
| + | :[[File:InstallVisimage7.png]] | ||
| + | |||
| + | |||
| + | * Click Finish once the installation has completed | ||
| + | :[[File:InstallVisimage8.png]] | ||
| + | |||
| + | |||
| + | === Running Visimage === | ||
==Oracle VM Virtual Box== | ==Oracle VM Virtual Box== | ||
Revision as of 20:21, 15 November 2013
Contents
Summary
Visimage requires a 32bit Operating System to run. In order for Visimage to run on 64bit versions of Windows 7, a virtual machine must be setup running a 32bit Windows Operating System (XP, Windows 7, Windows 8) The following instructions will guide through setting up a few Virtualization solutions to run Visimage.
Windows 7 XP Mode
Download and Installation
- Begin the XP Mode installation here
- Choose your Language and click Continue

- Click Continue to begin the genuine Windows validation process

- Run the GenuineCheck.exe program

- Copy the Validation code

- Paste the Validation code into the Validate entry box and click VALIDATE

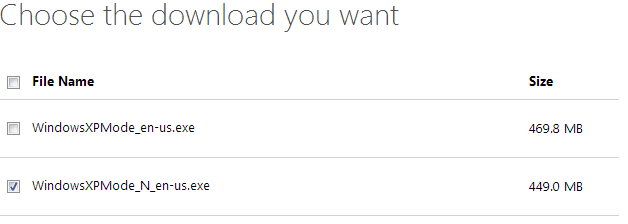
- Select your language and click Download

- Choose a file and click Next
- Note: XPMode_N does not include Media Player

- After the download has completed, follow the Install Instructions

Setup and Launch
- Double click the exe and click Run

- Click Next

- Select the location to place the XP Mode virtual hard disk file and click Next

- Allow the UAC prompt and click Finish after the install completes

- If you Accept the License Agreement, click Next

- Enter the credential information and click Next

- Select the applicable automatic updates configuration and click Next

- Finish the setup by clicking Start Setup

Installing Visimage
- Download Visimage to the Desktop using this url : http://www.vital-soft.com/download/secure/software/Visimage_2602_Setup.zip
- Unzip Visimage_2602_Setup.zip and run the Visimage_2602_Setup.exe
- Click Next
- If you accept the terms in the license agreement click Next
- Enter the applicable information and click Next
- Choose the directory where Visimage should be installed and click Next
- Choose the path to store profiles and click Next
- Note: this is the Edit->Preferences profile path in Visimage
- File:InstallVisimage5.png
- Choose Typical and click Next
- Verify the settings and click Install
- Click Finish once the installation has completed